• Hello guest! Are you a Bearded Dragon enthusiast? If so we invite you to join our community and see what it has to offer. Our site is specifically designed for you and it's a great place for Beardie enthusiasts to meet online. Once you join you'll be able to post messages, upload pictures of your dragons and enclosures and have a great time with other Bearded Dragon enthusiasts. Sign up today!

New to Bearded Dragons

rob.kolm

Juvenile Dragon
3 Year Member
Messages
120
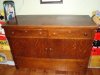
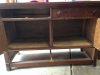
I am not yet a owner but am looking to get a bearded dragon. I was thinking of refinishing and converting a old wood buffet into an enclosure it is 48 inches long but only 20 inches deep. Will it be deep enough. Here is what I am looking to buy to convert.
 

Attachments

  • ImageUploadedByTapatalk1413566130.366401.jpg
    ImageUploadedByTapatalk1413566130.366401.jpg
    64.2 KB · Views: 200

jarich

Bearded Dragon Veteran
Messages
552
Location
New York
Hi Rob and welcome to the forum!

As for the dresser, thats quite a nice piece of furniture. And yes, its a good size too. The height is great and your dragon will make full use of it. Looks like its a good solid piece and shouldnt be too hard to adapt. I would guess you could just replace the large middle doors with sliding glass and take the back end off the three drawers, while still using the front panels. Always nice to have a beautiful outside of the enclosure too!
 

rob.kolm

Juvenile Dragon
3 Year Member
Messages
120
Thanks jarich I bought the dresser today and it's now my winter project.
 

rob.kolm

Juvenile Dragon
3 Year Member
Messages
120
So here is what I am thinking and I would love opinions. The bottom drawer below the floor will stay for storage. The center divider in the middle section will be removed and sliding doors put in across the enclosure. In the top section I will gut the drawer support while retaining the drawer faces as a false drawer. Lighting will be mounted from the dresser top and largely obscured from the outside by the false front drawer. From the exiting floor to the dresser top is 20 inches.

Thoughts?
 

Attachments

  • ImageUploadedByTapatalk1413666601.074198.jpg
    ImageUploadedByTapatalk1413666601.074198.jpg
    231.8 KB · Views: 183

jarich

Bearded Dragon Veteran
Messages
552
Location
New York
Totally your call, of course, but Id recommend taking out the bottom drawer as well as the top ones. With only 20 inches of height youre going to limit yourself on what you can do with lighting as well as your dragons ability to climb, which is something they love to do. Id always recommend everyone going higher with their dragon enclosures if possible.
 

rob.kolm

Juvenile Dragon
3 Year Member
Messages
120
Thanks again jarich that would be easy to do and give me another 8 inches vertical to work with.
 

rob.kolm

Juvenile Dragon
3 Year Member
Messages
120
Spent a good part of a long weekend working on it. After stripping I decided to do a dark stain so I am not going to bleach the wood and will just re-stain. I needed to add some support to bottom to be able to handle the floor with tile. Floor is 1/2 plywood and walls and back are 1/4 inch glued and nailed on with the help of a trim air nailer (back isn't actually attached yet as I need to cut venting. Going to do a light stain on the inside with spar varnish to handle the UV. Once I get my hardware in I will be doing some trim up front. I also need to mount the false drawers on the front. Electrical will run through the top where I will be building a 2x1x4inch box with a hinged top to access. I have some probe thermostats on order that will be inset on the front of the box.
ImageUploadedByTapatalk1415045464.384233.jpg
ImageUploadedByTapatalk1415045476.055095.jpg
 

rob.kolm

Juvenile Dragon
3 Year Member
Messages
120
Enclosure is moving along unfortunately I can only work on it on the weekends. Put in framing for the false doors
ImageUploadedByTapatalk1415838293.711458.jpg


Put the laches on the drawers to lock them in place.
ImageUploadedByTapatalk1415838351.521828.jpg


Fits in pretty well and covers gaps that feeders could get out of. You can also see the main cabinet is now stained.
ImageUploadedByTapatalk1415838404.879712.jpg


Had a hard time figuring out how to hide the edge of the plywood for the bottom and sides and decided to put some oak on the router table and build a ledge that covers the plywood and makes a step up from the floor to where the door track will be.
ImageUploadedByTapatalk1415838757.851485.jpg
 

rob.kolm

Juvenile Dragon
3 Year Member
Messages
120
All the staining is done. After I clean the sawdust from my shop I can start doing the spar poly on it. On the top is a hinged box with all the power stuff. The openings in the box will have 2 temp and one humidity gage mounted in with cover plates.
ImageUploadedByTapatalk1416092665.090288.jpg
 

rob.kolm

Juvenile Dragon
3 Year Member
Messages
120
Enclosure is now sealed and electrical is done. Tomorrow I expect to have it finished up. I have some ebay decor showing up Monday. Going to run a few days of temp tests and it will be ready for my dragon. Here is a pic of the electrical.
ImageUploadedByTapatalk1416709743.194544.jpg
 

babyb

Hatchling Dragon
Messages
70
Do you have any recent pics of it decorated? I can't wait to start on mine now!!!
 

rob.kolm

Juvenile Dragon
3 Year Member
Messages
120
Do you have any recent pics of it decorated? I can't wait to start on mine now!!!
I just finished and will be moving him in this week and will post. When you do yours please post progress pics I love learning how others do this stuff.
 

rob.kolm

Juvenile Dragon
3 Year Member
Messages
120
Temp testing is ongoing. I am running a 75 watt on the primary basking and a 50 watt on the secondary. Cool side is 80 but basking is 116 with the 75 watt. I am going to throw a dimmer on the line with the 75 and 50 watt and replace the 50 with a 75 and tune it down a bit with the dimmer. That should keep the cool side around 80 and bring down the primary basking to around 105-110.
ImageUploadedByTapatalk1416923649.872738.jpg
. So close.
 

Latest posts

Top