Stephen Vokoun
Hatchling Dragon
- Messages
- 51
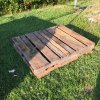
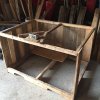
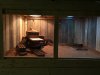
Hey everyone I'm Stephen I'm new to this fourm and I just wanted to post my new cage I built for my guy jax! I had him in a 55 gallon since he was about 3-4 In long. I share a basement with my little brother and have plenty of room and I wanted to build something bigger for him. So I am unemployed at the moment but I wanted the cage now! I used to work at petco and once a week we had truck come it with all the pallets and loaded with merchandise. I started to collect the pallets due to he fact that my dad wanted them. So anyways beside the fact I didn't wanna spent much money at all, so I decided to build it out of the pallets. The tank is 4 feet long, 3 feet wide, and 32 inches tall with the inside being right around 24 inches.
Everything I used
-Table saw
-Jig saw
-Tape Measure
-Saw horses
-Dremwell tool
-Sander
-Hammer
-Pry bar
Materials
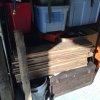
-about 5 pallets
-A sheet of 4 ply, ply wood 4x8ft
-About 4 (1x4x8) *For Trim*
-Misc. screws I could find
-2 big hinges I found in my barn
-2ft wide metal mesh
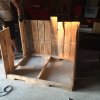
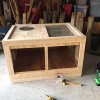
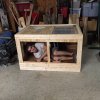
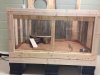
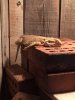
I started off by tearing apart the pallets by cutting some with the jig saw, and ripping some apart by hammers. After pulling one apart I would pull all the nails out of the wood from the pallets. Once all the pallets where apart and had no nails I began some construction. I used the main 2x4 that are in the center of the pallet for my base. Since they are already 4 feet long I had my front and back,then just cut 3 of them down to 3ft. Lined them all up and screwed them into the a rectangle. If you decide to make your cage out of pallets its extremely important to pre drill all holes making sure none of the wood will split!!!! After making the base I decided on the height of the tank to be 30in high I used all the wood from the pallets and cut them to 30 inches then sanded them all down real good, making sure they where generally clean and no sharp splinters or anything, these will be used for the walls. After I had them all to the point they would fit around the two sides and back I made the top Frame. By using more of the 2x4s from the center of the pallets I ran them through the table saw ripping them at 1 and 1/2 of a inch that way the top Frame did not weigh as much as the bottom. Then I just created another 4x3ft Frame. So now that I have all the siding cut and sanded, and the base and top frames made its time to attach all the siding by screwing it into the base then the top. I got the hole back and one side screwed into the bottom before I lifted the top frame and started to screw that in. Once you get all that screwed in and set you basically have your cage. You just need a front and the top. The 4x8 piece of ply wood I bought, I had them cut into two 4x3 foot sections witch left over a 4x2 foot section that fit almost perfect in the front. With the other 4x3 foot section of ply wood I took a five gallon bucket and traced a circle where I wanted his heat lamp. Then on the other side I cut out a rectangle for his uvb bulbs (both cut wit the jigsaw).I wanted to build the lights into the top of the cage but I already had both the heat lamp and uvb strip so might as well used them to save money. That being said I moved on to sliding the floor in (one of the 4x3 sections) and drilled that in. Moved up to the top and did the same to the cage top(for both open sections on this piece I cut the wire mesh and stapled underneath the openings) . Now that I had the walls screwed in, the floor, and top it was time to put on trim work. For the trim I just used the 1x4x8 pieces and cut them how I decided to do the trim work. Now that all the trim work is screwed on it was time to figure out what I wanted to do about the front the front I kinda messed up on because I wasn't really sure what I wanted. I ended up just sliding in that last piece of 4x2 foot section of ply wood into the front it was a tight fit so it stood in there on its own. I started to work the trim up the front then just screwed that front section into the face plate. Once I got it down stairs that's when I put the plexi glass in(if using plexi glass always predrill and never take the protective film off untile you are sure you know how it will fit and that's how you want it) Now its all complete I put two hinges on the back that attach to the top that way I can open it from the top, with a little finger latch for me to hold onto to lift it.
I appreciate everyone who reads this! Feel free to comment and ask questions I will answer anything anyone is wondering. This is my first time ever posting on a forum so forgive me if the post is a little lousy I am trying to figure out the format and how to work everything out!")
Everything I used
-Table saw
-Jig saw
-Tape Measure
-Saw horses
-Dremwell tool
-Sander
-Hammer
-Pry bar
Materials
-about 5 pallets
-A sheet of 4 ply, ply wood 4x8ft
-About 4 (1x4x8) *For Trim*
-Misc. screws I could find
-2 big hinges I found in my barn
-2ft wide metal mesh
I started off by tearing apart the pallets by cutting some with the jig saw, and ripping some apart by hammers. After pulling one apart I would pull all the nails out of the wood from the pallets. Once all the pallets where apart and had no nails I began some construction. I used the main 2x4 that are in the center of the pallet for my base. Since they are already 4 feet long I had my front and back,then just cut 3 of them down to 3ft. Lined them all up and screwed them into the a rectangle. If you decide to make your cage out of pallets its extremely important to pre drill all holes making sure none of the wood will split!!!! After making the base I decided on the height of the tank to be 30in high I used all the wood from the pallets and cut them to 30 inches then sanded them all down real good, making sure they where generally clean and no sharp splinters or anything, these will be used for the walls. After I had them all to the point they would fit around the two sides and back I made the top Frame. By using more of the 2x4s from the center of the pallets I ran them through the table saw ripping them at 1 and 1/2 of a inch that way the top Frame did not weigh as much as the bottom. Then I just created another 4x3ft Frame. So now that I have all the siding cut and sanded, and the base and top frames made its time to attach all the siding by screwing it into the base then the top. I got the hole back and one side screwed into the bottom before I lifted the top frame and started to screw that in. Once you get all that screwed in and set you basically have your cage. You just need a front and the top. The 4x8 piece of ply wood I bought, I had them cut into two 4x3 foot sections witch left over a 4x2 foot section that fit almost perfect in the front. With the other 4x3 foot section of ply wood I took a five gallon bucket and traced a circle where I wanted his heat lamp. Then on the other side I cut out a rectangle for his uvb bulbs (both cut wit the jigsaw).I wanted to build the lights into the top of the cage but I already had both the heat lamp and uvb strip so might as well used them to save money. That being said I moved on to sliding the floor in (one of the 4x3 sections) and drilled that in. Moved up to the top and did the same to the cage top(for both open sections on this piece I cut the wire mesh and stapled underneath the openings) . Now that I had the walls screwed in, the floor, and top it was time to put on trim work. For the trim I just used the 1x4x8 pieces and cut them how I decided to do the trim work. Now that all the trim work is screwed on it was time to figure out what I wanted to do about the front the front I kinda messed up on because I wasn't really sure what I wanted. I ended up just sliding in that last piece of 4x2 foot section of ply wood into the front it was a tight fit so it stood in there on its own. I started to work the trim up the front then just screwed that front section into the face plate. Once I got it down stairs that's when I put the plexi glass in(if using plexi glass always predrill and never take the protective film off untile you are sure you know how it will fit and that's how you want it) Now its all complete I put two hinges on the back that attach to the top that way I can open it from the top, with a little finger latch for me to hold onto to lift it.
I appreciate everyone who reads this! Feel free to comment and ask questions I will answer anything anyone is wondering. This is my first time ever posting on a forum so forgive me if the post is a little lousy I am trying to figure out the format and how to work everything out!
Attachments
-
 b1.JPG1.8 MB · Views: 151
 -
 b2.JPG1.6 MB · Views: 154
 -
 b3.JPG978.9 KB · Views: 153
 -
 b4.JPG732.2 KB · Views: 152
 -
 b5.JPG778 KB · Views: 155
 -
 b8.JPG876.2 KB · Views: 150
 -
 b9.JPG863.4 KB · Views: 160
 -
 bd6.JPG1.9 MB · Views: 137
 -
 b7.JPG1.6 MB · Views: 125
 -
 b10.JPG1.9 MB · Views: 127
 -
 b11.JPG60.1 KB · Views: 122