• Hello guest! Are you a Bearded Dragon enthusiast? If so we invite you to join our community and see what it has to offer. Our site is specifically designed for you and it's a great place for Beardie enthusiasts to meet online. Once you join you'll be able to post messages, upload pictures of your dragons and enclosures and have a great time with other Bearded Dragon enthusiasts. Sign up today!

Banyon Info

atochats

Juvenile Dragon
Messages
432
Location
Midwest USA
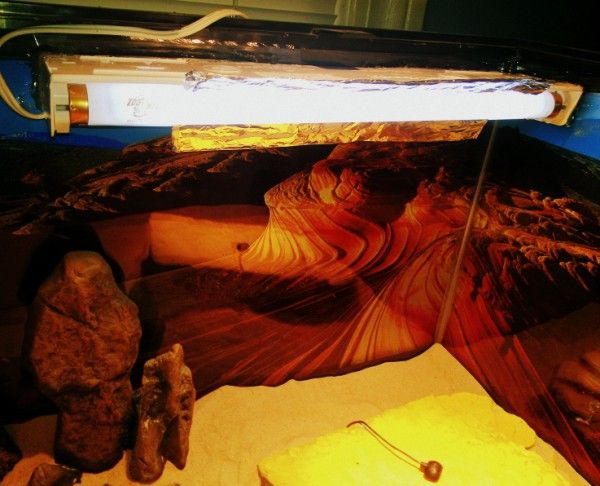
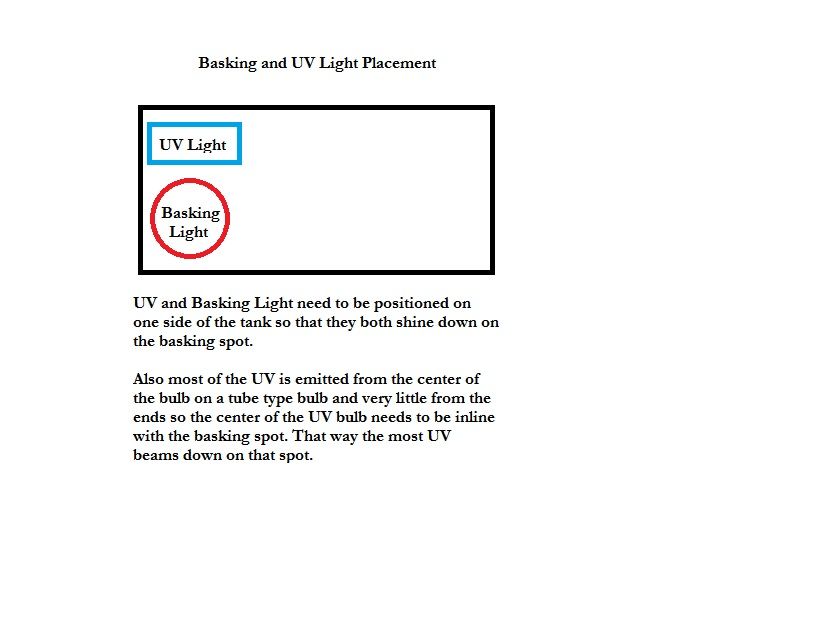
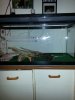
Banyon's tank is a 20 gallon (pricing 75 gallon tanks currently to move him into). Substrate is green "carpet", UV light is 15 watt, daytime light is 150 watt, nighttime light is 75 watt. Hot side during the day is 100-110 degrees, cool side is pretty stable at 85 degrees. He is handled at least twice daily, most of the time more often. He has "soothing" baths 2-3 times per week, unless he's shedding then more frequently. He gets misted daily. I never get him wet before bedtime because I don't want the temp to drop unless he's completely dry. Due to his diet, he gets messy so I will wash his feet and face after he's done if necessary, then leave him alone to relax. (I am currently feeding him a cricket/baby food/calcium powder "slurry" in order to get some veggie nourishment into him 2-3 times a day). He eats 6-10 crickets per feeding. If he's fussy, I put him back in his tank because I figure for whatever reason, he's just not in the mood to be handled...most of the time it's because he has to poop. I clean his wood, carpet, and tank weekly with a very mild bleach/water mix. His crickets are in a 10 gallon tank kept in the basement (it's cooler) with food and water (yellow jellow stuff) dishes. I pick out the dead ones daily. This tank gets cleaned each time I purchase more crickets (about 1 per week).

2013-05-28 14.11.14.jpg
2013-05-28 14.14.00.jpg
 

atochats

Juvenile Dragon
Messages
432
Location
Midwest USA
Additional info: He also occasionally gets mealworms (he loves them). Daytime lighting is on about 14 hours per day. His tank gets covered when his nighttime light is on... my work schedule is crazy and I want to keep sunlight out until I SAY it's daytime lol. No choice if I want him to have a regular feeding schedule. Poop gets removed as soon as I see it...(the white you see on the carpet is excess calcium powder.) The baby food I use is organic and I vary the flavors for nutritional variety. From the pics I've viewed and advise given... I need to get that bigger tank ASAP. I didn't realize the tank was THAT much too small for him or that it could stunt his growth.
 

Mungi's Buddha

Bearded Dragon Veteran
1,000+ Post Club
Messages
1,122
Location
Mungi's World- Dayton,Ohio
Thanks for the info. From what I can tell I will place money on Banyon's issues are directly due to improper enclosure and set up as well as a few other things I will mention.
To help you out I am going to post some links at the bottom which contain a wealth of info to help you start correcting things and get him back on the right track. Be sure to take the time to read through everything at least once as it will save you a lot of headaches and concern.

The minimum sized enclosure for a baby or juvenile bearded dragon is a 20 gallon LONG tank and not a standard 20 gallon tank which appears to be what he is in now. 20 gallon long tanks give less height and more floor space which is crucial to these creatures as they are terrestrial. A 20 gallon LONG will also help you get the proper temps and gradients that he requires to grow and thrive as well as digest his food.
I do not see any proper thermostats on his enclosure and without those there is no way to know if his temp setup is correct. Analog thermometers will not work and you will need to purchase two(2) digital thermometers W/remote probes to use. The placement of the probes is vital for correct readings. One must be attached directly on the basking spot to get the basking temperature which needs to 110 degrees for his age. The other attached in the coolest part of the enclosure and should be kept at 80-85 degrees.
At night you DO NOT want any lights on in his enclosure because they will interfere with his sleep. Also NO additional heat is needed at night unless the ambient temperature in your home drops below 65 degrees at which point you should only use a CHE or ceramic heat emitter set up on a thermostat and dialed in to just knock the chill off the air and get it back to 65 degrees. CHEs produce heat without light so it will not interfere with his rest. Dragons also need a chance to cool off at night and will sleep deeper.
You need to be using a 10.0 or 10% UV lamp over his basking area along with a proper wattage bulb. If you are using a 150 watt basking light I will guarantee that the temp in that enclosure is much higher than you think which can be dangerous for your dragon. I use a 75 watt household indoor floodlight for our Mungi's 40 gallon breeder tank and have to suspend it a good 7-8 inches above his basking spot to keep it from getting too hot.

Without proper lighting and UV your dragon can not digest food properly and is probably contributing to his lack of appetite. There is no reason that you should be having to feed the gruel mixture to him. Live prey crickets that are well hydrated and gutloaded should suffice and he needs to be allowed to hunt them. Also be aware that many dragons will not eat when they are being watched. Best practice is to put his feeder in his tank and walk away. You can leave them there all day but be sure to remove any left before lights out as they will disturb his rest.

The majority of young dragons show little or no interest in greens or veggies. Dont worry too much about this. Just keep them available is his enclosure fresh daily regardless. As he matures he will gravitate more to them.

Bathing more than once per week is excessive and should not be done unless your dragon is in shed at which point you might throw in an extra soak that week to ease the shed process. Or unless the dragon is ill and requires extra hydration due to being on meds.


In the info provided in the links there is an excellent schedule you should follow as far as feeding and supplementation. Be sure to review it and adopt it.

There is more but this is a start and the info in the links will give you much more. Should you have any further questions after reading it then shout out and we will try and help.
Hope this helps get you started getting Banyon fixed up and back on track.

Here are those links:)

Basic BD Care Sheet-A Place to Start

Bearded Dragon Exclusive Care Library

Bearded Dragon Diet Nutritional Information

Bearded Dragon Co-Habitation-A Good Plan???

How To Sex A Bearded Dragon
 

Mungi's Buddha

Bearded Dragon Veteran
1,000+ Post Club
Messages
1,122
Location
Mungi's World- Dayton,Ohio
Wanted to add in here that a 40 gallon Breeder tank is perfectly suitable for an adult bearded dragon and that many folks will start out with that size for their young dragons in order to save money. You could go ahead and get a 40 gallon Breeder tank now instead of the 75 gallon and Banyon will be set and perfectly happy for life with that proper sized enclosure.
Enjoy!:)
 

atochats

Juvenile Dragon
Messages
432
Location
Midwest USA
Well it sounds like I'm doing quite a lot of things wrong with my baby boy. I will read through the links you posted, but for now I will immediately discontinue use of the "nighttime" light (I was told that since it glows red it was specially made for night use, and also doesn't give off nearly as much heat) and also get the correct thermometers...placing them differently within the tank. I will move on from there making adjustments as suggested as quickly as possible. I think I may have given the wrong impression about his appetite...he eats greedily when I feed him calcium powder coated live crickets, he lunges and hunts and loves to track them down! He is a happy hunter :) The problem I am having is getting him to eat greens. I was under the impression that at his age, it is crucial that he begin eating them. I was concerned about his long-term health, so since he won't eat ANY veggies or fruits I've tried, the only thing I could think of was to coat the crickets in the veggies he needs (the baby food). I guess it does sound rather stupid of me to have been doing this. I was just very worried he wasn't getting what he needed...in the process, it seems, I have been overlooking many other things that he needs. Thank you for the advice and references, I'm not sure what a "10.0 or 10% UV light" is...but I'm sure I can find out by searching a bit. The tank and strip light housing he's using now, which has the UV strip light bulb in it, was used before for fish. (I just bought a different bulb). I figured I could get some use out of the equipment until he grew out of it. I figured when I upgraded, the bigger the better... its good to know he'll do just fine in a smaller tank than I had originally been pricing. Thank you again for pointing out what I'm doing wrong. He looks and acts strong and healthy now, but with some changes I know he'll stay that way:) This forum is just what I've been looking for, I'm really enjoying reading the posts and responses and learning a lot from others' questions and experiences. The pictures are awesome too!
2013-04-20 13.08.51.jpg
 

Mungi's Buddha

Bearded Dragon Veteran
1,000+ Post Club
Messages
1,122
Location
Mungi's World- Dayton,Ohio
I didn't see the florescent fixture you have on the enclosure in your pics the first time because it is a bit dark. That fixture is workable as long as you have the correct bulb. What you need is a ReptiSun or ReptiGlo 10.0 bulb.
I use and recommend the 18" bulb because they work best on tank enclosures.
With the fixture you have it can only be used on top of the screen which will mean that the bulb will not last but 6 months max before it will need to be replaced.
A better way to mount is by using an inexpensive under the cabinet mount fixture which can be found at places like Walmart for around 10 bucks and then use a hot glue gun to secure it to the inside glass just under the tank rim.
Here is a pic of how I mount mine.
UVmountOne600x486_zps91a9ad00.jpg


Mounting the UV bulb like this will serve a couple of purposes. First it will give your dragon full unfiltered UV since it is not having to go thru the screen which can block up to 50% of the UV.
Secondly it will allow you to get both your UV and Basking lights lined up properly so that both lights are shining directly down on the basking spot where your dragon will spend the majority of his time.
And it will also save you money because mounting the UV like the will mean you only have to replace the bulb once per year.
ReptiSun and ReptiGlo tube light can be found readily. Just make sure that you buy the 10.0 bulbs. Amazon is a where I buy mine a lot of times because the price is usually decent..cheaper than pet shops.
Something to keep in mind about UV lights is that the majority of the UV is emitted from the center of the tube and very little from the ends so when mounting you want to line up the center of the UV with the basking light and again have both shining down on the basking spot.
Here is a diagram of proper placement. It can be done on either end of the enclosure.
Light_zps129ff33a.jpg

This mounting and positioning will be difficult in your current tank but once you get your new tank will work easily and by mounting the lighting on one end of the enclosure it will give your dragon the ability to get away from the UV when he needs to which is also important in a setup.
If your are pricing 40 gallon Breeder tanks the ones I use are the Critter Cage ones by Zilla. They have a sliding/lockable screen top that is very nice.
On a different note I am including another diagram for you to use when you get your 40 gallon Breeder tank that will show you how to use inexpensive slate tiles for your enclosure substrate. It only requires 3-12 x 12 inch tiles and 6- 6x6 inch tiles. If you purchase the tiles at Lowes they will make the few cuts that have to be made for you for free usually. The diagram shows the dimensions to have the tiles cut to and how to place them in the tank.
Slate tiles are an inexpensive and good choice at any age for your dragon. They do not have to be glued in and can be easily taken out for cleaning and they have the added benefit of naturally keeping your dragons nails trimmed.
Tile diagram for 40 gallon Breeder tank:
40gbtilesetup.jpg

One last thing..make sure that along with dusting your crickets that they are also well hydrated and properly gut loaded before you feed them to your dragon. They should be fed a proper gut load at least 24 hours beforehand. Cricket gut load is available at most pet shops or you can save a lot of money by making your own. Just Google Cricket Gut load Recipes.
Enjoy your day...we are glad to have you with the BDF and don't worry we will always help you get the right info you need to give your dragon exactly what he needs to thrive.:)
 

Jon Macintosh

Juvenile Dragon
Messages
136
Location
Missouri
Slate tiles are an inexpensive and good choice at any age for your dragon. They do not have to be glued in and can be easily taken out for cleaning and they have the added benefit of naturally keeping your dragons nails trimmed.
40gbtilesetup.jpg

Mungi, I have a buddy in construction who gave me a few slate tiles that I've been considering trying out for Merlin's tank.
They are from Lowe's and the sticker simply said "Slate Tile" above the UPC.

My quick question is, how should they be cleaned before they go into the tank?
I've tried simply wiping them down with hot water at first, but no matter how many times I wipe, it results in a "dirty" towel.

Could this be due to the fact that they are unsealed, or is this simply expected of slate tile?

Any insight would be greatly appreciated!
 

Mungi's Buddha

Bearded Dragon Veteran
1,000+ Post Club
Messages
1,122
Location
Mungi's World- Dayton,Ohio
Depends on the tile itself. Slate being a raw natural stone it's to be expected a liitle but I wouldn't be too concerned. What I do when cleaning the tiles is that I wash/scrub them in a 10% bleach 90% water solution then rinse them with plenty of clean water. After that I place them in my oven at 225-250 degrees F and bake them for 30 minute then allow them to cool completely before putting them back in the enclosure.
That is the same process I use for any non meltable furnishing in our enclosure.
Anything thing that could melt is disinfected/cleaned the same way and allowed to completely air dry just skipping the baking step.
I also use the baking step when using Washed, Sifted, Children's Playsand in enclosures. (Washed,Sifted Children's Playsand is only a safe substrate for bearded dragons that are healthy, well hydrated and 10+ inches from snout tip to tail tip)
Enjoy!
 

Jon Macintosh

Juvenile Dragon
Messages
136
Location
Missouri
Many thanks for the information!
I'll give that process a whirl! They are a little brittle in some areas and I'd hate for him to injest any pieces in his tasting-the-environment process.
If they still come out appearing a tad too brittle/powdery, I'll go shopping around for some slightly for refined pieces.
 

Mungi's Buddha

Bearded Dragon Veteran
1,000+ Post Club
Messages
1,122
Location
Mungi's World- Dayton,Ohio
That would be a better choice if they are a flaky tile. Always best to err on the side of safefy. Lowes and Home Depot have slate tiles that are refined for usually a couple of bucks a piece depending on which you get so when tiling a 40 gallon Breeder tank you aren't talking a big expenses. I get mine from Lowes because they will cut them on the spot for me here and for free. Home Depot won't.
Also when picking tiles stay away from any that are glossy slick finished and the clay Saltillo tiles.The textured slate or granite ones are the only one to use. Also darker tiles will hold heat more.
Enjoy:)
 

atochats

Juvenile Dragon
Messages
432
Location
Midwest USA
I am so excited! After much frustration, I called Petco here locally and they said they had 1 Zilla Critter Cage 40 gallon breeder tank in stock for $119. I jumped in the truck and hurried to Petsmart. Yes, I said Petsmart. This "blonde moment" had wonderful consequences. In the back storage area, buried under various other stuff on a pallet, they had the same exact tank and when she scanned it, it was $54 bucks! Apparently it was on clearance due to outdated packaging! Really? Like I care about the lack of bright colors on the packaging? Well, I made sure it had proper dimensions so that if need be, down the road, I could get a replacement screen lid if the existing one happened to break or something and hurried to the checkout lane thankful and smiling. I had bought a digital thermometer with probe, and am now in the process of trying to establish a good temp range within the new tank. Attached are photos of the new tank and the location it will eventually get moved to. The piece of driftwood has sentimental value, and I am hoping its not going to clutter up the tank too much and will be of some use to him for climbing and resting? Also, the attractive (wine shipment) box I thought might serve as a nice basking area? I realize I'll have to figure out some way to provide a hiding spot, and also leave room for water and food dishes on the cool side. It's a work in progress. The bulb currently in use is the kind that has the darkened sides, as to direct the light straight down. The temps are reading as follows: Directly under light=113F (too hot)...Slightly away from directly under=91F (too low)...Midpoint of tank=78F...Far end of tank=76F. I am thinking I might try buying a bulb that doesn't have the shielded sides, and/or I'd like to try hanging the basking light up off the screen a bit (notice how the ceiling has a low point that I can screw a hook into). Well, I just felt the need to share my good fortune, and where I'm at regarding the new set up. Note: Banyon seems a very happy camper now that the cricket "gruel" is over... and he seems to be sleeping deeper and waking more rested and energetic now that I've stopped using the red night warming light :)

2013-05-31 12.41.19.jpg
2013-05-31 13.09.35.jpg
 

Mungi's Buddha

Bearded Dragon Veteran
1,000+ Post Club
Messages
1,122
Location
Mungi's World- Dayton,Ohio
Glad to hear you were able to get a great deal on the 40 Critter Cage! You will need to have 2 of the digital probe thermometers set up. If you get them at petsmart I always get the ones that are located in the aquarium section instead of the reptile section. They are usually a couple of bucks cheaper.
Your temperatures are naturally going to fluctuate a little during the day so I would not be to worried about a degree or two variance. Placement of the thermometer probes is critical. The one needs to be attached directly to the basking spot not near it or in the general area but on it. The second in the cool side.
You also need to have the enclosure completely set up and where it is going to be before you can get the temps. One area of your home may be cooler or hotter than another which will affect the temps in the tank.
Please do not put a water dish or water bowl in the enclosure. It is not needed nor desired in a bearded dragon enclosure as most do not recognize standing water as something to drink. Therefore the water dish will only serve to raise the humidity of his tank which is not what a dry, desert climate creature needs.
All he requires is a basking spot of proper temp, a single food dish for his veggies and perhaps a large rock that will naturally help keep his nails trim.
A hide is also not necessary as most dragons won't use them unless they are brumating and even then some like our Mungi don't use them.
The best policy for setting up an enclosure for a growing dragon is to KEEP It SIMPLE:) Stay with just the basic needs.That will make things much easier for him.
Also remember that when you move him to the new tank he will require another acclimatization period to get used to it just like when you first brought him home.
Enjoy!
 

atochats

Juvenile Dragon
Messages
432
Location
Midwest USA
Well, on my way to getting the new tank set up. I have a good temp range from one end to the other (the red "night light" is being used to gently warm the mid section of the tank. It seems to work pretty well. All lights are turned out at night.) I placed the tank where it is destined to stay within our house. I took out the wooden box because the surface seemed to be too slick, and replaced it with three rougher textured stones. He seems to really enjoy this :) The large driftwood came out and was replaced with his original piece of wood, which takes up considerably less room, and gets used when (I suspect) he wants to bask slightly to the side of the light in a lower temp. or maybe just at a higher elevation. He likes to sometimes sleep inside the wood tunnel looking thing, plus it helps to prop the branch up at an angle. Trying to keep it simple, and I did get a second probe to monitor temps. Having quite a time attaching the "hot" probe to the stone...also he usually lays directly on top of it, which gives a very false reading lol. The water dish isn't out in the pic here, and I still need to glue the UV light to the inside lip of the tank. Question: he does seem to enjoy laying in his water dish, is it really that bad to leave it in? Also, I should continue to mist him daily, right? I've cut back on his baths...he did get one yesterday (which he seemed to enjoy immensely) he is in the process of shedding again and had quite a bit of skin hanging around his head, mouth, and neck areas. He adjusted very well to the new tank...he's such a good boy! Had him out on Saturday and a handful of people held him (the neighbor's son graduated) including a few small children. I had everyone wash their hands afterwards...he behaved admirably and even waited till he was back in his tank to do his business:) I attached a couple of photos.. how do I attach them like you do? So that they don't show up huge, but rather a bit smaller and within the text? (yes, I am a blonde). Thanks so much :)

2013-06-02 11.43.43.jpg
2013-06-02 11.45.56.jpg
 

Germ

Bearded Dragon Veteran
3 Year Member
1,000+ Post Club
Messages
4,493
Location
North America
how do I attach them like you do? So that they don't show up huge, but rather a bit smaller and within the text? (yes, I am a blonde).
The pics must be re-sized to a smaller version prior to posting, in order to have the smaller version shown. A really neat & simple program to do this is PixResizer, just be sure to watch all the check boxes, during the install (If you choose to use it), to be sure that you are not giving permission to install a bunch of other crap (Toolbars, default search engines, etc.) along with it. It is a safe install, but you have to watch what is checked for install or not. Some other info on posting Pics ~ How To Post Pictures, YouTube Video Tutorials, Smart Phones & Tapatalk Pic Posting

You must get the UVB closer to the animal by raising the basking spot &\or mount the fixture under the screen. As it is setup now, your BD is getting very little effective. useable UVB coverage, if any at all. UVB bulbs have a very limited range, do not emit sufficient strength UVB coverage as far as the visible light shines & a fine screen can block\filter, reflect as much as 50% of it from ever entering the enclosure, drastically reducing it's effective range. UVB bulbs also loose their effective strength\distance quickly as the bulb ages & is why they must be regularly replaced.

Good Luck
 

atochats

Juvenile Dragon
Messages
432
Location
Midwest USA
O.K. so I haven't done anything with the whole resizing of my pic thing, and I do apologize. Been trying like crazy to get his UV light set up right within the tank instead of sitting on top of the lid. This Zilla Critter Cage with the sliding lid leaves absolutely no accessible surface on which to hot glue the under the cabinet light bracket. (I did get the proper 10.0 bulb) Both the front and the back "under" surfaces of the aquarium "lip" are covered when the lid is slid closed. I thought about hot gluing the light to the under surface of the lid itself instead, but that would move the light each time the lid was slid opened and closed... which I didn't figure was a good thing. Didn't figure hot glue would adhere to glass. Tried suction cups, not stable enough and was afraid it would fall on him. Prop the bracket on a frame of some sort like a rock structure, afraid he might try to climb on it and hurt himself by either the heat of the bulb or it falling. Finally I came up with this... see pics. Although it looks much closer, I measured the distance from his basking spot to the closest part of the bulb, and it is 9 inches away. I know pics have been posted (Mungi's Buddha) I guess I just don't understand how exactly you accomplished it. Wish I did, it looks much better than what I came up with. My main concerns are fire hazard (I may have to replace the zip ties with something else if I feel the bulb is getting too hot near them) and that it is secure enough for his safety. The zip ties are loose enough as not to put pressure on the bulb itself, and the wire brackets it's hanging from are bent coat hanger pieces so they are pretty darn strong and secure. Any comments, criticisms, or suggestions are absolutely welcome.
 

Attachments

  • 2013-06-07 03.52.39.jpg
    2013-06-07 03.52.39.jpg
    2.1 MB · Views: 39
  • 2013-06-07 03.52.59.jpg
    2013-06-07 03.52.59.jpg
    1.7 MB · Views: 40

Germ

Bearded Dragon Veteran
3 Year Member
1,000+ Post Club
Messages
4,493
Location
North America
Hot glue adheres very well to glass & plastic, & is how MB describes it to be mounted. Mine have been mounted to the glass this way for just about a decade without the slightest hint of releasing.
 

Mungi's Buddha

Bearded Dragon Veteran
1,000+ Post Club
Messages
1,122
Location
Mungi's World- Dayton,Ohio
If you go back to the pics I posted of the UV fixture mounted in Mungi's 40 gallon Breeder tank (which is a Zilla Critter Cage) the biggest difference in how I mounted the fixture and how you have yours mounted is that you glued on the top (wide) section of the fixture and I glue it on the narrow back and side of the fixture. On the Zilla tanks I also glue the fixtures just under the inside black plastic rail(rim) to the glass of the tank.
This results in the light facing out and down and keeps it well away from the dragon's reach.
Another thing I do is use a piece of heavy aluminium foil slipped behind the bulb to act as a reflector directing all of the UV downward and toward the basking spot.
I may be able to take some better pics to show the mounting but its fairly straight forward as to how its done. You just need to be fairly quick in applying the hot glue and getting it in place before the glue cools.
Enjoy!
 

atochats

Juvenile Dragon
Messages
432
Location
Midwest USA
"and then use a hot glue gun to secure it to the inside glass just under the tank rim."
I suppose if I had re-read this part of the sentence more carefully I could have avoided a load of headaches for myself. I'm very glad I didn't return the hot glue gun and glue sticks I bought! I thought surely you wouldn't have suggested something unless it worked... I was just missing something. Yep... I was. Thank you both for pointing out my error and oversight and I will get on this project ASAP. BTW I really love this tank, it's convenient to access the inside and provides loads of floor space for Banyon. I will need to work on raising his primary basking area too as has been suggested. I'm tellin ya... between the "cricket gruel" and now this... I'm really feeling pretty embarrassed here. Thanks again :)
 

atochats

Juvenile Dragon
Messages
432
Location
Midwest USA
Well, complications. I must not have gotten the glue on fast enough (and I went as fast as I could) because although it seemed secure for almost an hour, when I came back home from dinner with the hubby... it had fallen. I freaked. I checked Banyon over till he was sooo frustrated, flexing joints, checking toes, watching him walk and move. He is eating and pooping normally and acting normally too. I am so thankful! I am scared to try that again.... and then on Sunday I sliced my palm open and needed stitches. Did I mention that topical anesthetic has no effect on me and I could feel every one of them? Urgh, I'm having issues. Really don't want to offend, but I'm thinking about going back to the "bracket idea" that I posted earlier.... with some major tweaking. Trying to cut thin sheet metal slightly smaller than the light frame itself, and securing them together using bolts, lock washers and nuts. The brackets to hang would be bent to fit around the bolts and sandwiched in between the two. That light ain't goin nowhere if it kills me! Germ and MB...please don't be mad. I know you know what you're talking about. Just don't want to take the risk of messing up again. Wouldn't forgive myself.
 
Top