• Hello guest! Are you a Bearded Dragon enthusiast? If so we invite you to join our community and see what it has to offer. Our site is specifically designed for you and it's a great place for Beardie enthusiasts to meet online. Once you join you'll be able to post messages, upload pictures of your dragons and enclosures and have a great time with other Bearded Dragon enthusiasts. Sign up today!

Building Mt. Mungi ;)

Mungi's Buddha

Bearded Dragon Veteran
1,000+ Post Club
Messages
1,122
Location
Mungi's World- Dayton,Ohio
HiYa Folks!;)
Some of you may have heard that I am in the process of building out Mungi his "Big House"..Tis true and has become a true labor of love in every aspect..lol..the new enclosure is 5ft long by 2ft deep by 27 1/2 inches tall (the height I needed to ensure proper interior lighting distances once all furniture and a 4 inch base of playsand is in place...Washed and Sifted Quikrete Premium PlaySand of course.lol)
Anyhow when dealing with large scale enclosures the selection of interesting premade furniture is limited to say the least and since this will be Mungi's GrownUp Permamnent House I decided to make him something more fit for the Awesome-ness he is.
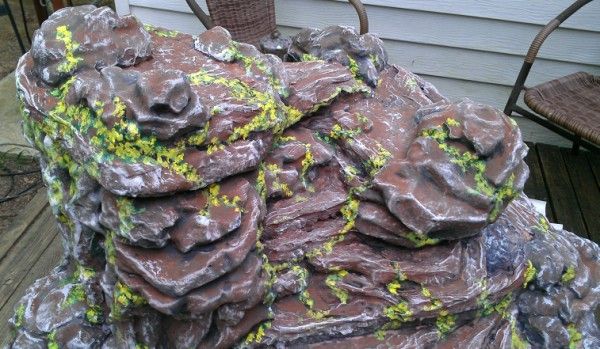
Below you will find some pictures that I will call The Building of Mt. Mungi;) I will update them as I go thru the stages to complete it.
This is actually a fun and easy project albeit a little messy but then again gettin messy is something I have enjoyed since I was a kid and its always a good thing to "let the kid out";-)
Supplies are simple,inexpensive and all readily available at places like Lowes and Home Depot.
Basic Supplies:
>1 pack(6 sheets) 3/4" x 14" x 48" Polystyrene- approx $6/pack
>2 tubes Construction Adhesive- There are different ones but I use Liquid Nails
>1 can Great Stuff Expandable Foam (make sure to get the type that hardens)- approx $4/can
>1-2 10lb boxes Polyblend NON-Sanded Grout - approx. $11/box
>Misc Acrylic Paints if you plan to paint or highlight- I use Artist's Acrylic Paints for at any Art Supply Store. They are totally safe, dry fast and dry to hard plastic. Can also be painted over if you dont like the way something turns out;)
>Acrylic Sealant for finished form.
Basic Tools:
>Knives- to cut and shape forms ( an electric carving knife is a Wonderful thing)
>Gloves-simple cheap dishwashing gloves work great
>Eye protection and mask-This depends on just how messy you get with your creation..lol..however in all seriousness the grout comes in a fine powder form and is Portland Cement. It does create some dust when mixing it and it is not something you want in your lungs or eyes;)
>Mixing Bowl or small bucket -to mix grout in.
>Cheap Paint Brushes
>Newpaper or dropcloth
> A Well Ventilated Area
and finally as well as most importantly...YOUR IMAGINATION;)

Your supply list may vary depending on the size and shape of your creation.

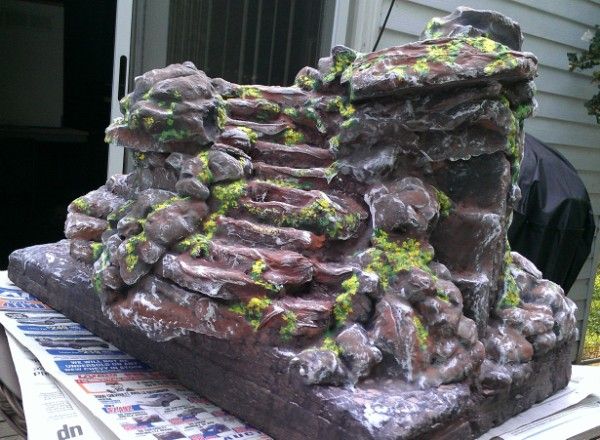
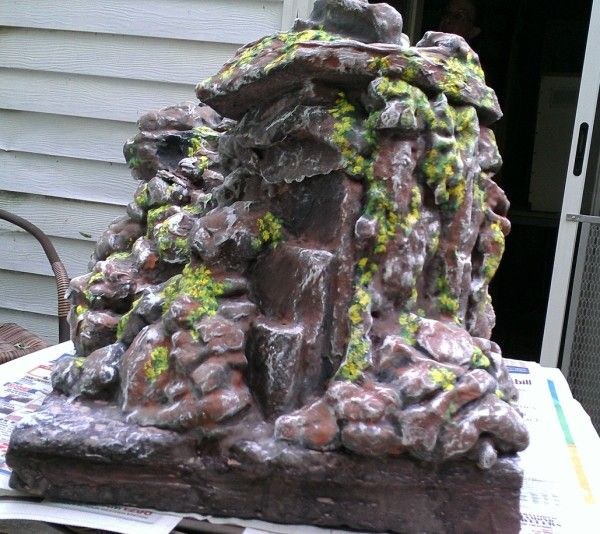
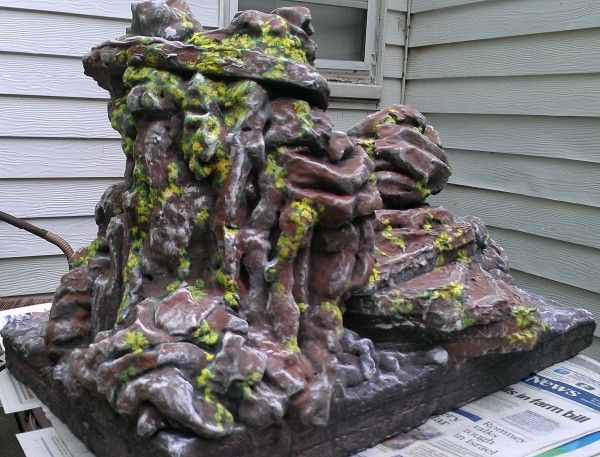
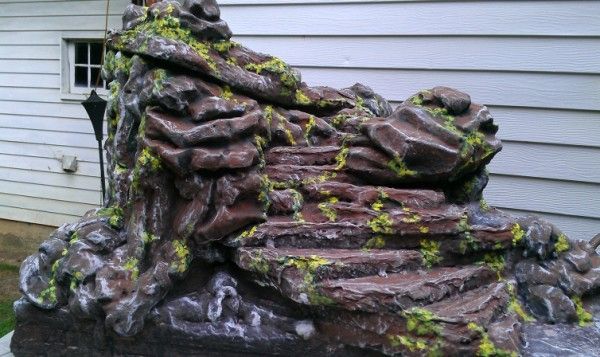
Mt. Mungi is approximately 25 1/2 inches long x 18 inches wide x 15 1/2 inches tall at it's highest point.

Here We Go!!

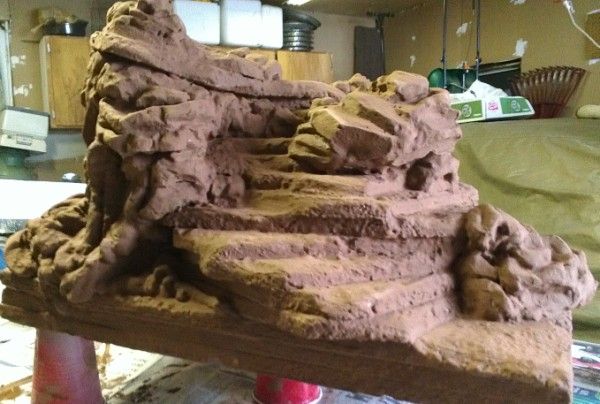
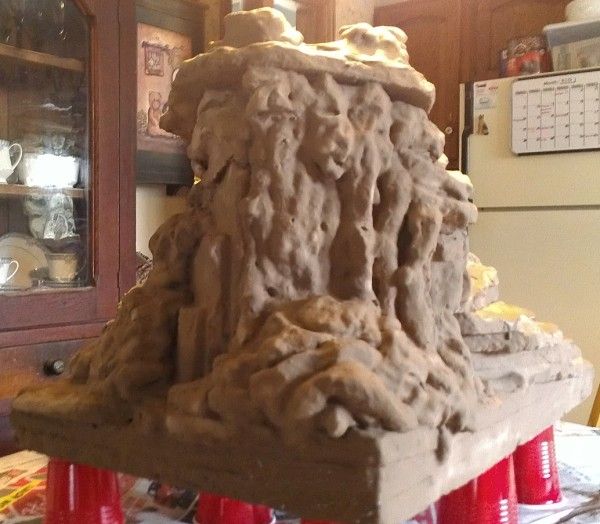
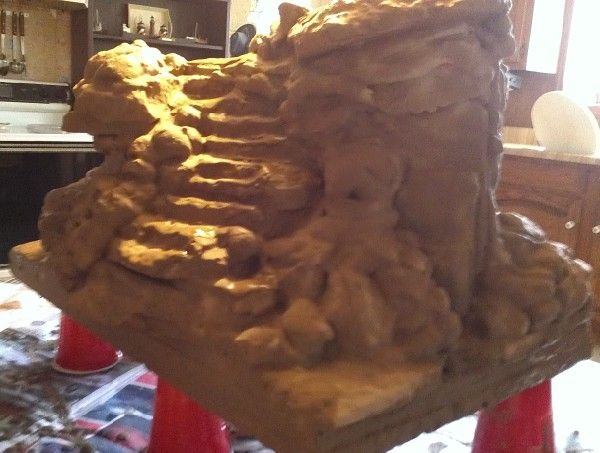
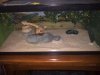
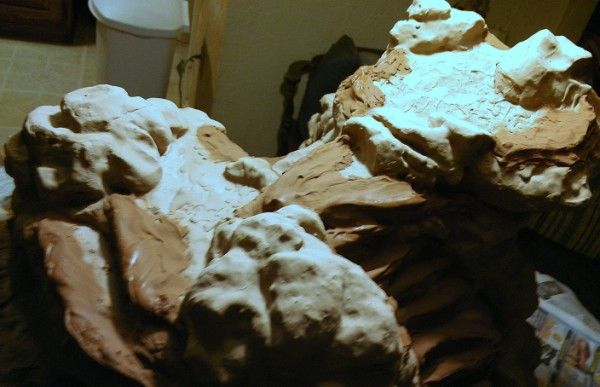
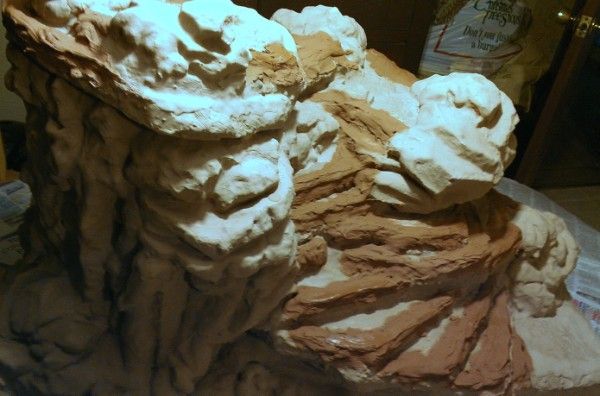
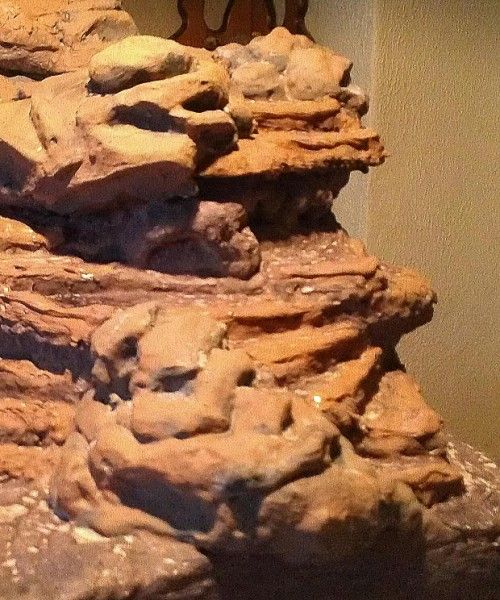
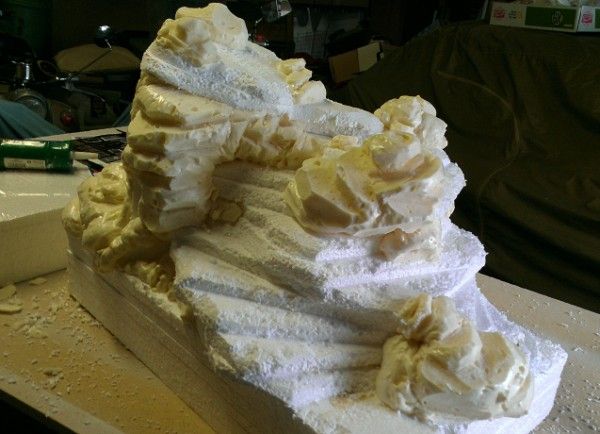
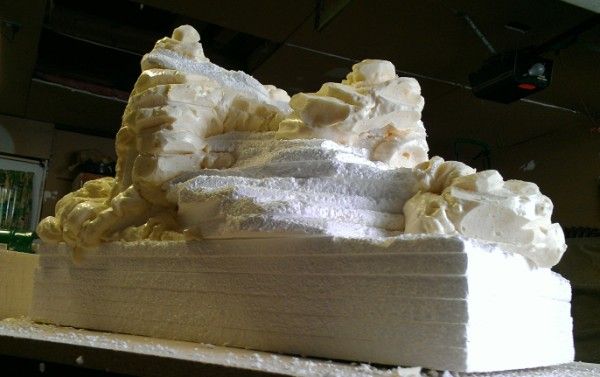
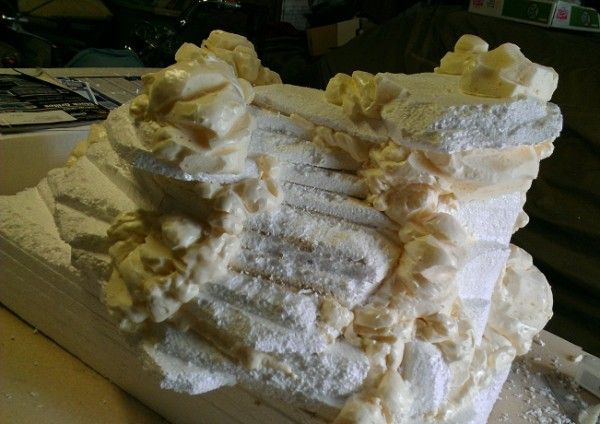
Stage 1 Pics- basic form of Mt. Mungi done by simple stackin and gluing the sheets of Polystyrene pieces to get basic height and levels. The glue was allowed to dry overnight. Then I used the Expandable Foam to add rock formations. Allowed that to dry overnight until hard and then used knives to carve the foam to more resemble boulder formations. The hardest part of this is knowing when to stop carving. You just want the basic forms. tiny details will get lost once you start applying the grout layers.

stageOne1.jpg


stageOne2.jpg


stageOne3.jpg


stageOne4.jpg


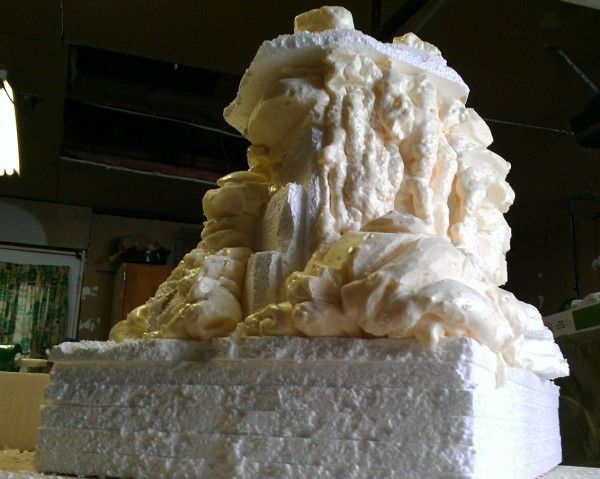
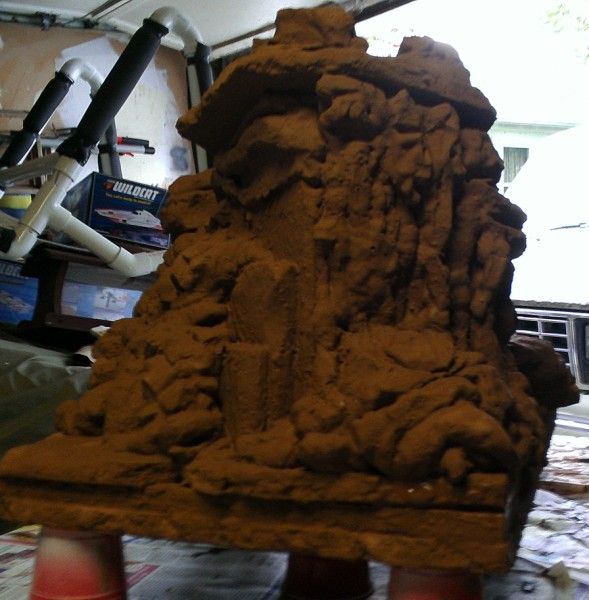
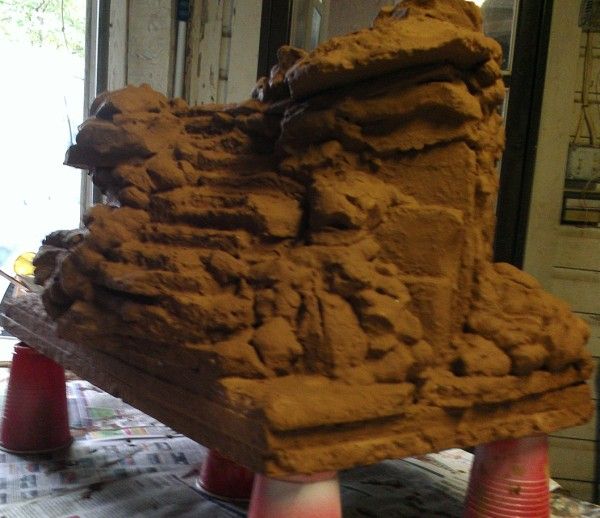
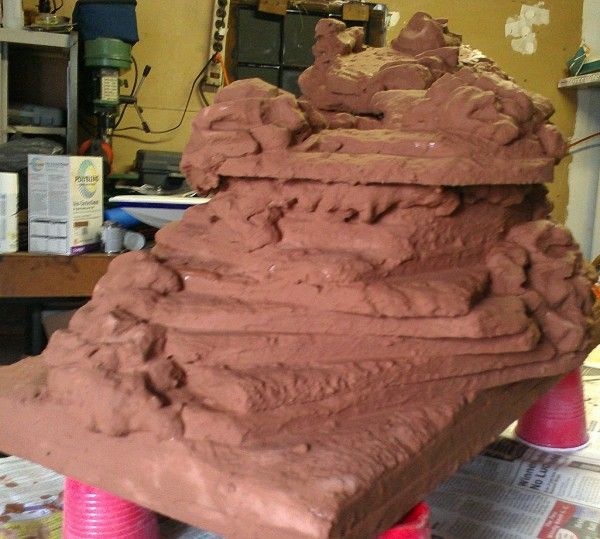
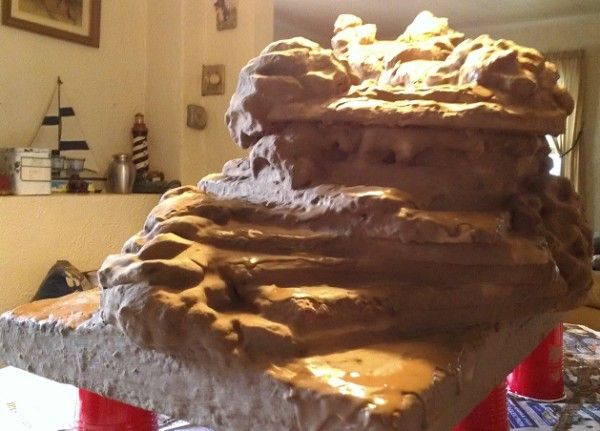
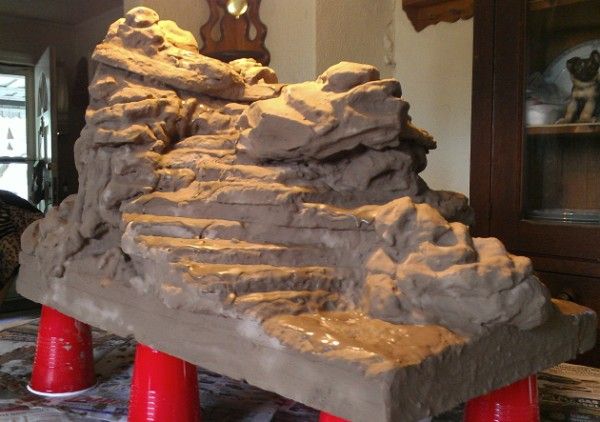
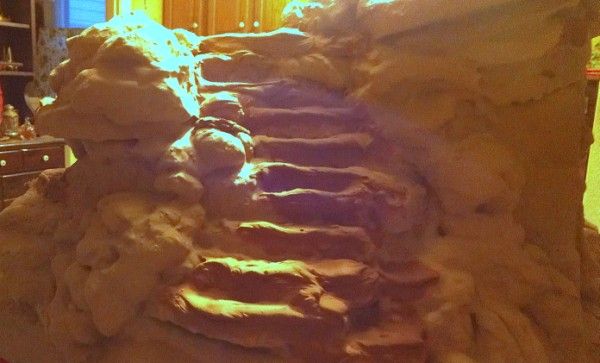
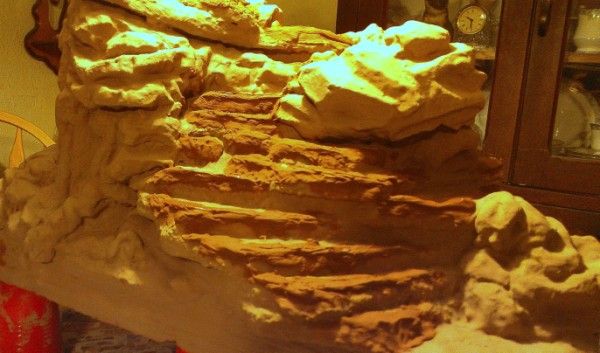
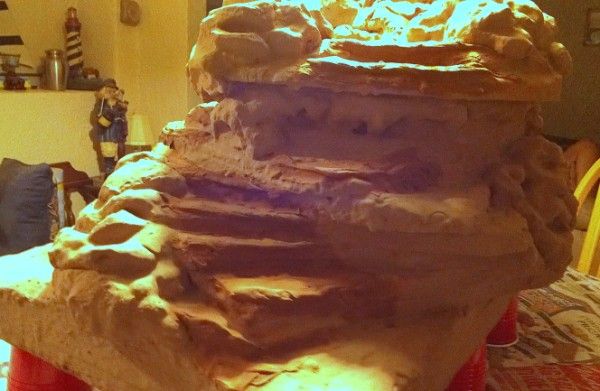
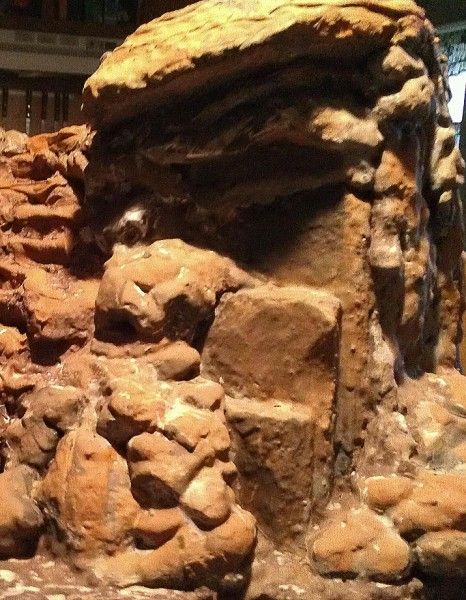
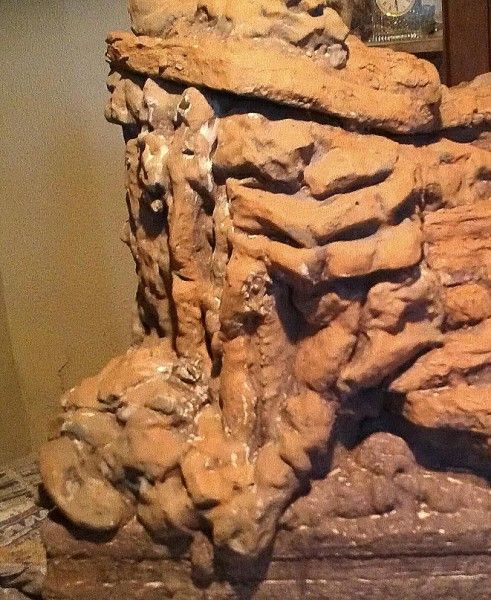
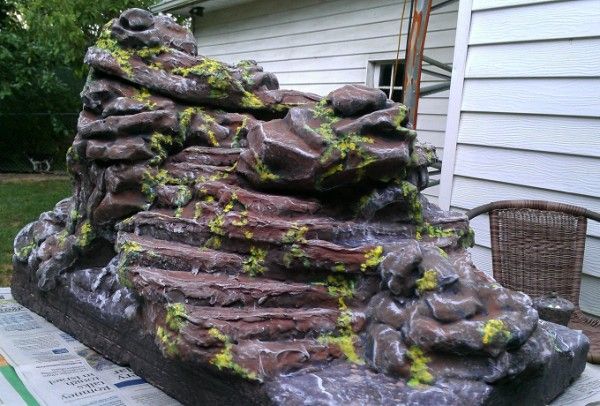
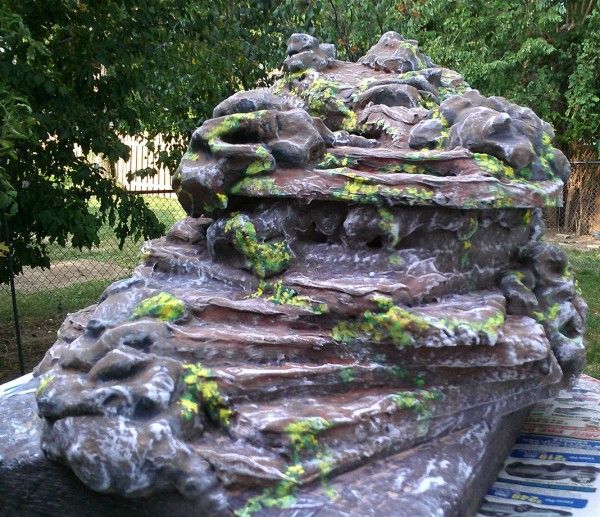
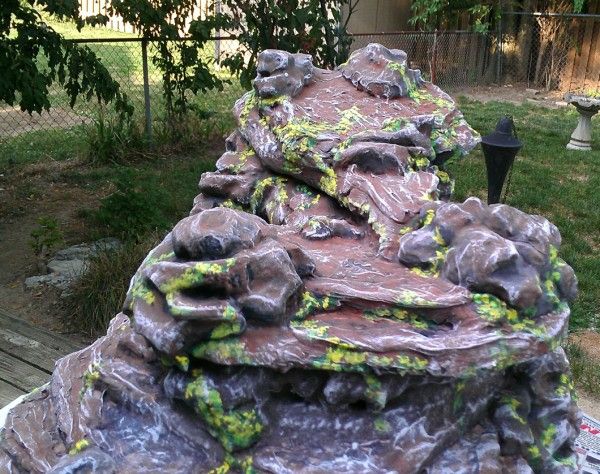
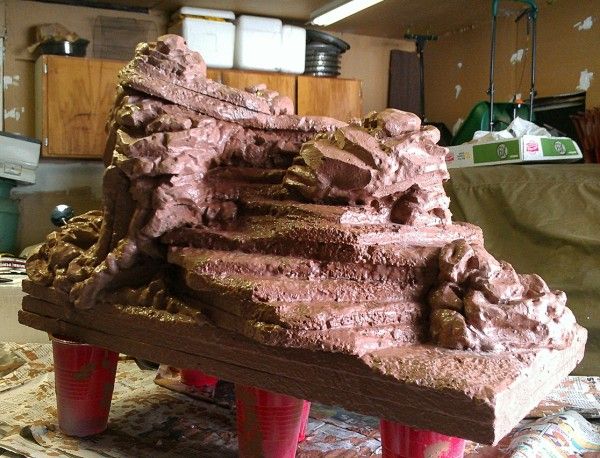
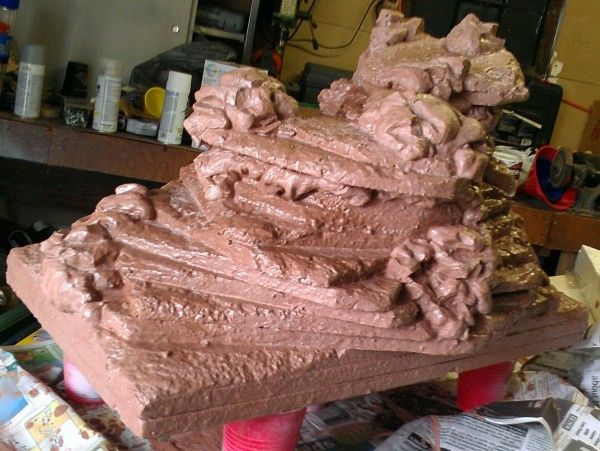
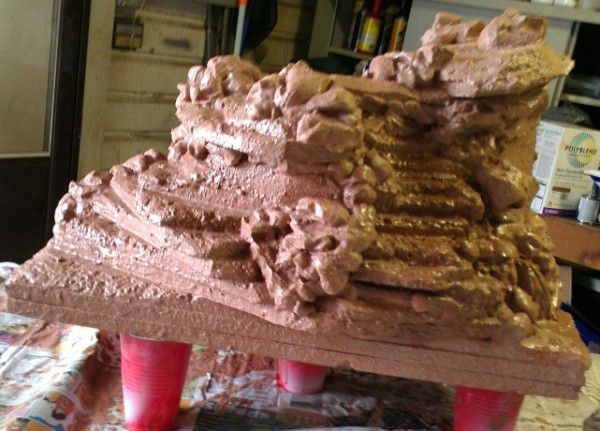
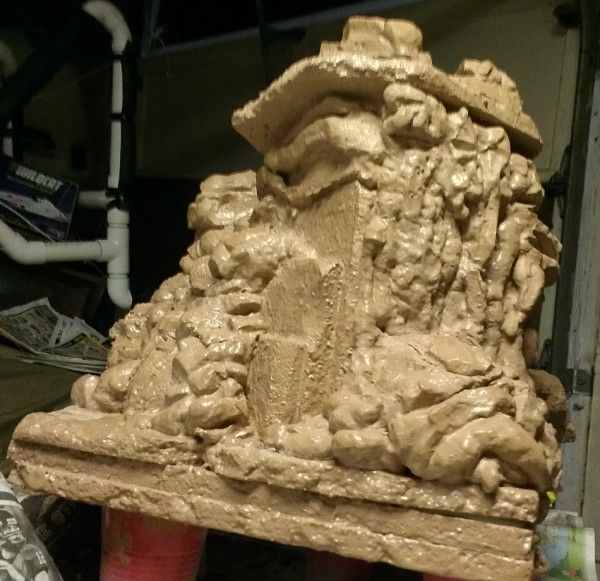
Stage 2 Pics - After you have your basic form complete it's time to grout! These pics show the form after the first layer of grout is applied.
Note:
>When mixing the first layer grout make it about the consistency of loose pancake batter. Dont make it too thick because you want it to flow into the crevices, nooks and crannies. Applies using your cheapo paint brushes. Also about every 10 minutes re-stir your grout mix.
>When finished allow the grout to completely dry for approximately 24 hours before gong to next step.
>And Dont Forget To Coat The Bottom Of Your Form! (I told you you were gonna get messy..lol..I place the form on top of Red Solo Cups to dry, btw:)

stageTwo1.jpg


stageTwo2.jpg


stageTwo3.jpg


stageTwo4.jpg


MORE PICS TO COME TOMORROW AFTER STAGE THREE IS COMPLETE!!;)
 

Mungi's Buddha

Bearded Dragon Veteran
1,000+ Post Club
Messages
1,122
Location
Mungi's World- Dayton,Ohio
8/14- Stage Three building Mt. Mungi;)

After having allowed the initial coat of grout to completely dry for 24 hours it was time to apply grout coat #2 to the mountain. The first coat was very liquid if you remember. The second coat was thicker..about the consistency of thick batter but still able to flow into crevices.
Note: When handling your piece after the first coat be careful because the grout is a little brittle. You may also see some cracks or even pieces that will flake off. Don't worry just handle with care and apply the thicker second coat.
Here are the pics of Mt. Mungi just after having 2nd coat of grout applied. In a couple of the pics you may see what appears to be white areas as if I missed those areas. Actually those are reflections of wet grout is all.
Also with the thicker grout you can start building up areas..It's hard to see in the pics but additional grout was added to the stair step edges which will aid Mungi in climbing;-)

stagethree1.jpg


stagethree2.jpg


stagethree3.jpg


stagethree4.jpg


More pics to come after this dries (24 hours) and I put on next coat! ;-)
 

Noella

Bearded Dragon Veteran
3 Year Member
1,000+ Post Club
Messages
2,802
Location
Georgia
Great structure! I wish I could do something like that for Allie. I've been having some difficulties with her driftwood feature right now. It keeps falling onto her hammock and small basking rock cave. I'm seriously considering of using wood and screws to keep it from falling.
 

Mungi's Buddha

Bearded Dragon Veteran
1,000+ Post Club
Messages
1,122
Location
Mungi's World- Dayton,Ohio
@Noella...Thank you;)...you should give this project a try for yourself...it's really not difficult and great fun...just takes a lil time and patience:)
In the meantime if you decide to use wood and screws to secure your current perch make sure that you do not use any types of wood that are aromatic or that leak sap..ie pine, cedar,etc..they are dangerous to your dragon..in addition to that you need to make sure that any screws used are covered..I recommend countersinking and at least covering the head with silicone..this is a personal choice but have had other criters hang claws on exposed screw heads...not pretty...also.remember to let the silicone completely cure..the fumes while curing are toxic to your dragon too;)
An easier solution may be to simply use a brick or two to help wedge your limb and.secure it;)
Have a great nite;)

Sent from my ADR6425LVW using Tapatalk 2
 

Pat B

Super Moderator
Messages
1,469
Location
Columbia SC
You sure are a lucky Beardie....I wish I had one of those....it is awesome

Sent from my LG-P999 using Tapatalk 2
 

Noella

Bearded Dragon Veteran
3 Year Member
1,000+ Post Club
Messages
2,802
Location
Georgia
Thanks. I'll try that. Wouldn't want anything bad to happen to Allie's claws.
 

Mungi's Buddha

Bearded Dragon Veteran
1,000+ Post Club
Messages
1,122
Location
Mungi's World- Dayton,Ohio
Updated pics on the build of Mt. Mungi coming up on Thursday...got a lil cool last nite and slowed the drying of last coat of grout so am giving it an extra nite drying time;b

Sent from my ADR6425LVW using Tapatalk 2
 

Mungi's Buddha

Bearded Dragon Veteran
1,000+ Post Club
Messages
1,122
Location
Mungi's World- Dayton,Ohio
8/16- Stage #4 of the build of Mt. Mungi
After an extra day of drying time due to temperature drop after last coat of grout applied slowed the curing, I applied a third thicker coat of grout to the entire structure. This third coat thicker still than the previous two coat..would say a little bit like very thick pancake batter but still able to flow. Also used a different colour of grout..the first was called Nutmeg and it was a bit too red so I changed to one called Earth..you can use whatever colour you want tho. My reason is because at this point in the build I am planning how I will paint the structure and the browner base colour will work better than the red;-)
Also is the pics that show the staircasing I believe you can see some of the edge-building I spoke of before better..this is simply a matter of adding a little extra grout in key areas to help give Mungi better footing as he climbs.
Another thing I wanted to point out and should have in the beginning is the steepness of the stairs...this is something that you need to consider when you design your structure. It is a fact that as beardies age their desire to scale cliffs or steep things deminishes...if you make your structure too steep or too difficult to climb you may have problems getting your beardie to use it later on. So please think ahead.
Mt. Mungi is 15 1/2 inches tall at its highest point and although it's a little difficult to see in the pics all of the stairs are gradual easy climbs so hopefully Mungi will continue to enjoy and use the mountain for a long time;-)

Here are the Stage #4 pics...

stageFour1.jpg


stageFour2.jpg


stageFour3.jpg


stageFour4.jpg


More to come as the build continues;-)
 

Germ

Bearded Dragon Veteran
3 Year Member
1,000+ Post Club
Messages
4,493
Location
North America
It is looking as 'Regal' as it's namesake ...
icon_thumright-1.gif

Will be patiently be waiting for the next updates
6a01348745e23f970c0147e2e87911970b-200pi.gif
, it is an interesting build.
 

Mungi's Buddha

Bearded Dragon Veteran
1,000+ Post Club
Messages
1,122
Location
Mungi's World- Dayton,Ohio
@Germ...Thank you,Sir..glad you are enjoyin watchin it come together! Im very pleased with the progress and am hoping maybe the thread will inspire others to create something unique for their dragon;) It a fun project and actually nothing difficult involved..inexpensive too;)
Enjoy your evenin!

Sent from my ADR6425LVW using Tapatalk 2
 

Pat B

Super Moderator
Messages
1,469
Location
Columbia SC
Here is my enclosure with sand....I think spike likes it....

Sent from my LG-P999 using Tapatalk 2
 

Attachments

  • uploadfromtaptalk1345164653309.jpg
    uploadfromtaptalk1345164653309.jpg
    100 KB · Views: 569

Mungi's Buddha

Bearded Dragon Veteran
1,000+ Post Club
Messages
1,122
Location
Mungi's World- Dayton,Ohio
@PatB..looks great and he does look relaxed and comfy in there...I'd say you are doin things right;) I really like the stacked river rocks....read in other thread that you had hot glued them.I.think...great idea!
Enjoy your day tomorrow!

Sent from my ADR6425LVW using Tapatalk 2
 

Mungi's Buddha

Bearded Dragon Veteran
1,000+ Post Club
Messages
1,122
Location
Mungi's World- Dayton,Ohio
Stage #5- The Building of Mt. Mungi
Today's stage of the build consisted of concentrating on the stairways, a few touchups to the ridgelines of the basking areas and a final coat applied to the bottom of the structure. The grout I mixed up today was the consistency of cake frosting which allowed me to build up and shape the areas to my liking and to again add points of traction for Mungi.
This will be the final grouting done to the structure. After it dries completely I will begin the painting stage ;-)

Note: In the pictures you will see that I used the darker nutmeg coloured grout for this stage. I did this purely to make it easier for you to see exactly what I was working on. On your own structure you can use all the same colour;)

stageFive1.jpg


stageFive2.jpg


stageFive3.jpg


stageFive4.jpg


stageFive5.jpg


More to come!!! ;-)
 

Mungi's Buddha

Bearded Dragon Veteran
1,000+ Post Club
Messages
1,122
Location
Mungi's World- Dayton,Ohio
8/18 Stage 6- Beginning to turn Mt. Mungi to stone ;-)

Just a few pics to show some of the initial painting of the structure to make it look like real rock. This is done using the acrylic paints. More details will be added with sucessive layers as needed.
The painting process takes a little while. Acrylic paints dry fast so you can move at your own pace and your structure could be painted in a single day even. I prefer to stop and step away from it periodically to keep myself from over-doing it..lol ;-) I will probably paint on the mountain over the next couple of days but will update along the way so that you can watch ;-)

After the painting is complete there will only be one more stage which is to seal the structure ;-)

stageSix1.jpg


stageSix2.jpg


stageSix3.jpg


More to come tomorrow!!
 

Mungi's Buddha

Bearded Dragon Veteran
1,000+ Post Club
Messages
1,122
Location
Mungi's World- Dayton,Ohio
@Aleena...Thanks!:) It's a fun project...am.almost done with the final painting and will be posting pics either later tonite or first thing tomorrow...stay tuned and enjoy your evening;)

Sent from my ADR6425LVW using Tapatalk 2
 

Mark W

Juvenile Dragon
3 Year Member
Messages
127
Location
Murica
Great job! I can't wait to see how this project pans out! :)

I'll check in often and I can't wait to see what Mungi thinks when he tries it out! Mt. Mungi's gonna be awesome!
 

Mungi's Buddha

Bearded Dragon Veteran
1,000+ Post Club
Messages
1,122
Location
Mungi's World- Dayton,Ohio
8/20-Stage#7- Painting Mt. Mungi COMPLETE! ;-)

I am happy to announce that the construction of Mt. Mungi is done and all that remains is to seal the entire structure with 6 coats of acrylic sealer which I will begin tonite!
Since this structure was built to go in a dry environment I will be using Matte Finish Mod Podge (6 coats) and then follow that with a coat or two of Matte Finish Spray Acrylic Seal. The Mod Podge should be sufficient but I like taking the extra step of sealing that as well..the spray sealer is also non-yellowing and will keep the structure from discoloring under the intense basking light ;-)

Sooooo.. without futher delay...here is Mt. Mungi for your viewing pleasure!!

stageSeven1.jpg


stageSeven2.jpg


stageSeven3.jpg


stageSeven4.jpg


stageSeven5.jpg


stageSeven6.jpg


stageSeven7.jpg


stageSeven8.jpg


Hope ya'll have enjoyed following this project and I appreciate the comments that have been made! I also hope that this thread might just inspire you to give it a whirl yourself and create your own unique enclosure furnishings.

This project is easy, fun and actually inexpensive when compared to the prices charged by Pet Shops for similiar items. Much cheaper!
As stated earlier Mt. Mungi is 25 1/2 inches long X 18 inches deep X 15 1/2 inches tall at its highest point.

Final real cost was in the neighborhood of $30 dollars..some of the supplies listed at the onset I have excess left over for another project. And I have another one in mind already;-)

Also if you need more inspiration make sure to go check out Lizard-Lanscapes at the website below! The site is awesome and complete with instructions and videos of making these kinds of structures too! Great Site!!

http://www.lizard-landscapes.com/

Enjoy,Folks and Have a GREAT Evening!

;-) Mungi's Buddha ;-)


Mungi's Buddha

Bearded Dragon Veteran
1,000+ Post Club
Messages
1,122
Location
Mungi's World- Dayton,Ohio
Great job! I can't wait to see how this project pans out! :)

I'll check in often and I can't wait to see what Mungi thinks when he tries it out! Mt. Mungi's gonna be awesome!

Thanks, Mark! And Good Luck in starting highschool this week! I know you are excited and with good reason..lots of awesome times ahead for you and there is nothing better than opportunities to increase knowledge ANYTIME! Study hard, keep those grades up and most of all enjoy..YOU WILL DO JUST FINE! ;-) Oh and post up some new pics of Miss Eliza when you can..there are those of use that would enjoy seeing more of her!

Have a GREAT WEEK!
 
Top